HOW TO: [cut out characters] FOR DUMMIES!
Hello everyone, and welcome to my very first tutorial on this site.
You want a cover/art scene/splash/overlay, right? You don't want to pay, right? So here's an in-depth tutorial (edition: FOR DUMMIES), that will guide you throughout the whole process without making you spend ANY money. Enjoy!
This is PART ONE of "HOW TO: [cover]"
It doesn't take much to notice that many of you have no idea about making a decent looking edit. No offence. So you decide to ask someone who does know something about editing, and will be willing to do a cover for you, right? Wrong. But we'll get to that.
So you know, you want someone to do a cover for you. Where do you look for this person? Forums, right? Wrong, wrong, wrong.
I mean, come on, just look at all those „shops” and their work. It's clear they use frickin' mobile app to cut out characters from low quality screenshots. They have no idea what are they doing, either. I'm not gonna bring up any examples, 'cause I'm a decent person and don't want to ruin any teenager's life and dreams, but you have eyes, I'm pretty sure you can tell a difference between a good and terribly bad edit.
Let's get started. What do you need?
So you know, you want someone to do a cover for you. Where do you look for this person? Forums, right? Wrong, wrong, wrong.
I mean, come on, just look at all those „shops” and their work. It's clear they use frickin' mobile app to cut out characters from low quality screenshots. They have no idea what are they doing, either. I'm not gonna bring up any examples, 'cause I'm a decent person and don't want to ruin any teenager's life and dreams, but you have eyes, I'm pretty sure you can tell a difference between a good and terribly bad edit.
So, um, whataya say, I'm no artist, bish???Well, I'm gonna make you one in approximately 10 minutes. Bah! After reading this tutorial you WILL OWN YOUR OWN SHOP.
Let's get started. What do you need?
- Eyes
- Hands (Preferably both, but one will do)
- PC (I swear to god, if anyone asks for MOBILE tutorial I'm gonna find you and I'm gonna chop off your hands so you can NEVER edit anything, ever)
- Some editing software
- Decent browser
Software such as GIMP 2.0 (it's free) or if you own one, or know how to crack one – Photoshop.
I'm gonna be using GIMP for this tutorial (even tho I prefer PS, let's be real), cuz this is probably what most of y'all will be getting.
If you can't download and install this by yourself, just quit this, editing is not for you, go to some petty ""Art Shop"" owner.
Now, you need to open Writer's Portal and do the following:
1. Create a new story and name it "Covers (LL/INK)" - depending on whether you're going to do the Limelight or Ink edit, in case you're going to do edits in both, so you keep things organised. If you're not an organised person - become one, because you'll need that, while editing.
2. Create your character. Yep, just like that.
3. Now upload some plain background (unless your character wears only bright colours and Episode's black background will do for you) like white, or gray.
4. Now for the tricky part: place your character in the screen center as a starting point.
@CHARACTER stands at screen center AND CHARACTER faces [left/right] AND CHARACTER is [desired pose]
For this tutorial, I'm gonna be using simple flirt_wink_atcamera_pose as it's pretty much the easiest one, due to it's static form, therefore you don't have to time your screenshots right.
5. Preview your story, press directing helper on the preview, then spot helper. Now scale your character to fit the screen. I'm gonna do the knee's up character on my cover, so that's how I'm going to place it. And FYI, you shouldn't show more of your character than that. Just because it's a cover, not a poster, nobody's gonna see your character on a cover in an app, if you place full body there, let's be honest.
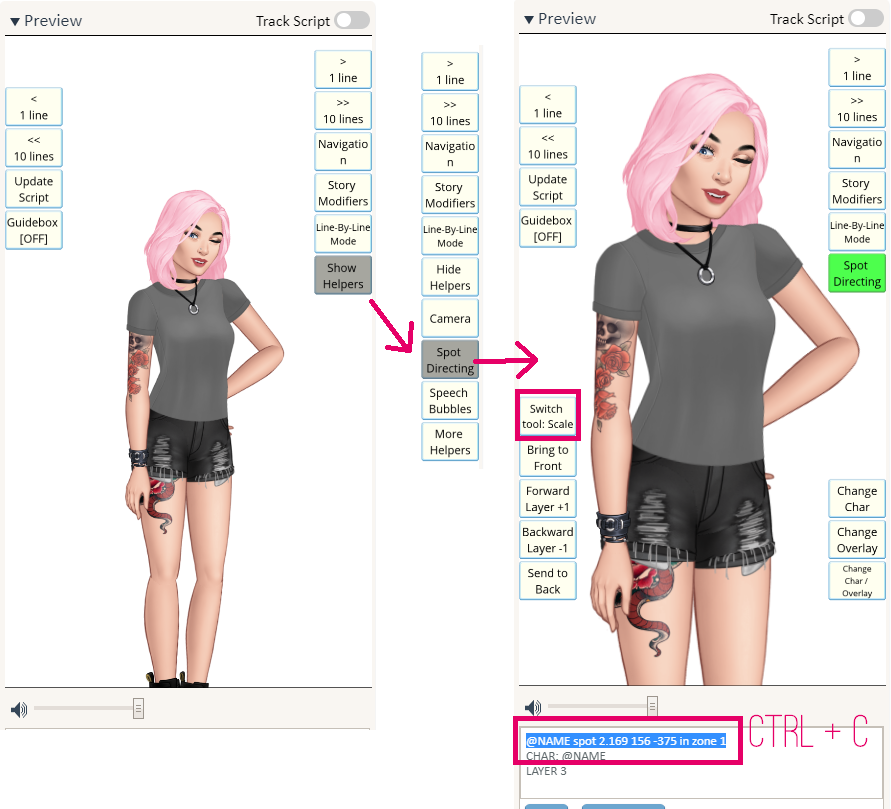
6. Now, that your character is exactly where you want it to be, you need to press "spot directing" to hide it, then "hide helpers" and then press "navigation" and "hide debug elements of HUD".
7. Now, press CTRL on your keyboard and zoom in with mouse wheel. If you're a Mac user then you should sell it and buy yourself a decent Windows PC, okay.
8. ZOOM IN BRO! To 200% or so. Now press your Print Screen button, open fricking Paint - YES, PAINT - and CTRL+V your screenshot. You should open 2 windows of paint. Once you paste the first screen, go back to Episode Interactive, scroll down to see bottom half of your character, screen again, and paste it in another paint window.
9. Now select your character and CTRL+X it.

10. Open THIRD window of paint and CTRL+V upper half of your character there. Hold and drag bottom part of canvas, to make it longer. Now do exactly the same with bottom half of your character to cut it out, but paste it in the third window, where one part of your character is and try to glue them together.


11. Now again hold bottom and right of canvas to fit the character, and leave as little of background as possible. Once it's done press CTRL+A to select whole canvas and CTRL+C to copy it.

You may ask: „Why all the effort, when I can just screen my character in outfi---” NO!!! YOU CANNOT. AND LET ME SHOW YOU WHY.


This is quality difference, my dear. If you do not see it or simply don't give a damn about this then leave this site, and never come back, cuz u r a piece of crap.
12. Now that easy part is over... time to open GIMP. Press CTRL+N to open a new file. Here are some of best sizes for various arts (width x height):
Small Cover - 966 x 1334
Big Cover - 966 x 642
Art Scene:
One Panel - 640 x 1136
Two Panels - 1280 x 1136
Three panels - 1920 x 1136
Pfp - 2048 x 2048
13. Now CTRL+V to paste your character and CTRL+Shift+N to create a layer with it. Change background to black or dark grey, if background you chose on Episode was white, or leave background white, if your character is on black/dark grey bg. To do that, press on background layer, find and select bucket tool and simply press on the canvas.

14. Now, select pasted layer, wand tool and click on the background, of your character. This will select the background, but not perfectly. We'll have to fix it anyway, in the next step. For now with wand still in your hands press and hold Shift, and click on empty areas, like between your characters' legs, under its' arms etc, while holding shift, this way, you are adding those areas to already existing selection. When everything is selected just press Delete, or CTRL+X and then CTRL+Shift+A to remove selection.

15. Now, if you zoom in (+/- or CTRL+Mouse Wheel) you can see, this isn't exactly what we're going for, so we have to fix this. Press Shift+E to save some time, instead of looking for eraser in all those tools. Adjust the size of your brush using [ and ] . You can hold those to change the size faster. Size 9 should do the trick tho.

16. Here's some of the Eraser' settings that may make your work easier. (Sorry for non-english version, I can't change it to language other than my software.)

17. All is left to do is... erase! It gets really relaxing, once you warm up your hand, I swear.

That's it for now, I'll see you in the next part, once y'all are done erasing those bitches XD ♥
Stay awesome!
xx
6. Now, that your character is exactly where you want it to be, you need to press "spot directing" to hide it, then "hide helpers" and then press "navigation" and "hide debug elements of HUD".
7. Now, press CTRL on your keyboard and zoom in with mouse wheel. If you're a Mac user then you should sell it and buy yourself a decent Windows PC, okay.
8. ZOOM IN BRO! To 200% or so. Now press your Print Screen button, open fricking Paint - YES, PAINT - and CTRL+V your screenshot. You should open 2 windows of paint. Once you paste the first screen, go back to Episode Interactive, scroll down to see bottom half of your character, screen again, and paste it in another paint window.
9. Now select your character and CTRL+X it.
10. Open THIRD window of paint and CTRL+V upper half of your character there. Hold and drag bottom part of canvas, to make it longer. Now do exactly the same with bottom half of your character to cut it out, but paste it in the third window, where one part of your character is and try to glue them together.
11. Now again hold bottom and right of canvas to fit the character, and leave as little of background as possible. Once it's done press CTRL+A to select whole canvas and CTRL+C to copy it.
You may ask: „Why all the effort, when I can just screen my character in outfi---” NO!!! YOU CANNOT. AND LET ME SHOW YOU WHY.
This is quality difference, my dear. If you do not see it or simply don't give a damn about this then leave this site, and never come back, cuz u r a piece of crap.
12. Now that easy part is over... time to open GIMP. Press CTRL+N to open a new file. Here are some of best sizes for various arts (width x height):
Small Cover - 966 x 1334
Big Cover - 966 x 642
Art Scene:
One Panel - 640 x 1136
Two Panels - 1280 x 1136
Three panels - 1920 x 1136
Pfp - 2048 x 2048
13. Now CTRL+V to paste your character and CTRL+Shift+N to create a layer with it. Change background to black or dark grey, if background you chose on Episode was white, or leave background white, if your character is on black/dark grey bg. To do that, press on background layer, find and select bucket tool and simply press on the canvas.
14. Now, select pasted layer, wand tool and click on the background, of your character. This will select the background, but not perfectly. We'll have to fix it anyway, in the next step. For now with wand still in your hands press and hold Shift, and click on empty areas, like between your characters' legs, under its' arms etc, while holding shift, this way, you are adding those areas to already existing selection. When everything is selected just press Delete, or CTRL+X and then CTRL+Shift+A to remove selection.
15. Now, if you zoom in (+/- or CTRL+Mouse Wheel) you can see, this isn't exactly what we're going for, so we have to fix this. Press Shift+E to save some time, instead of looking for eraser in all those tools. Adjust the size of your brush using [ and ] . You can hold those to change the size faster. Size 9 should do the trick tho.
16. Here's some of the Eraser' settings that may make your work easier. (Sorry for non-english version, I can't change it to language other than my software.)
17. All is left to do is... erase! It gets really relaxing, once you warm up your hand, I swear.
That's it for now, I'll see you in the next part, once y'all are done erasing those bitches XD ♥
Stay awesome!
xx